创建一个简单的自定义K8s Scheduler
在最近的论文工作中,我设计了一套面向安全的调度算法,为了实施这套调度算法,需要对k8s的scheduler进行自定义。整个过程并不困难,特此记录。
基本概念
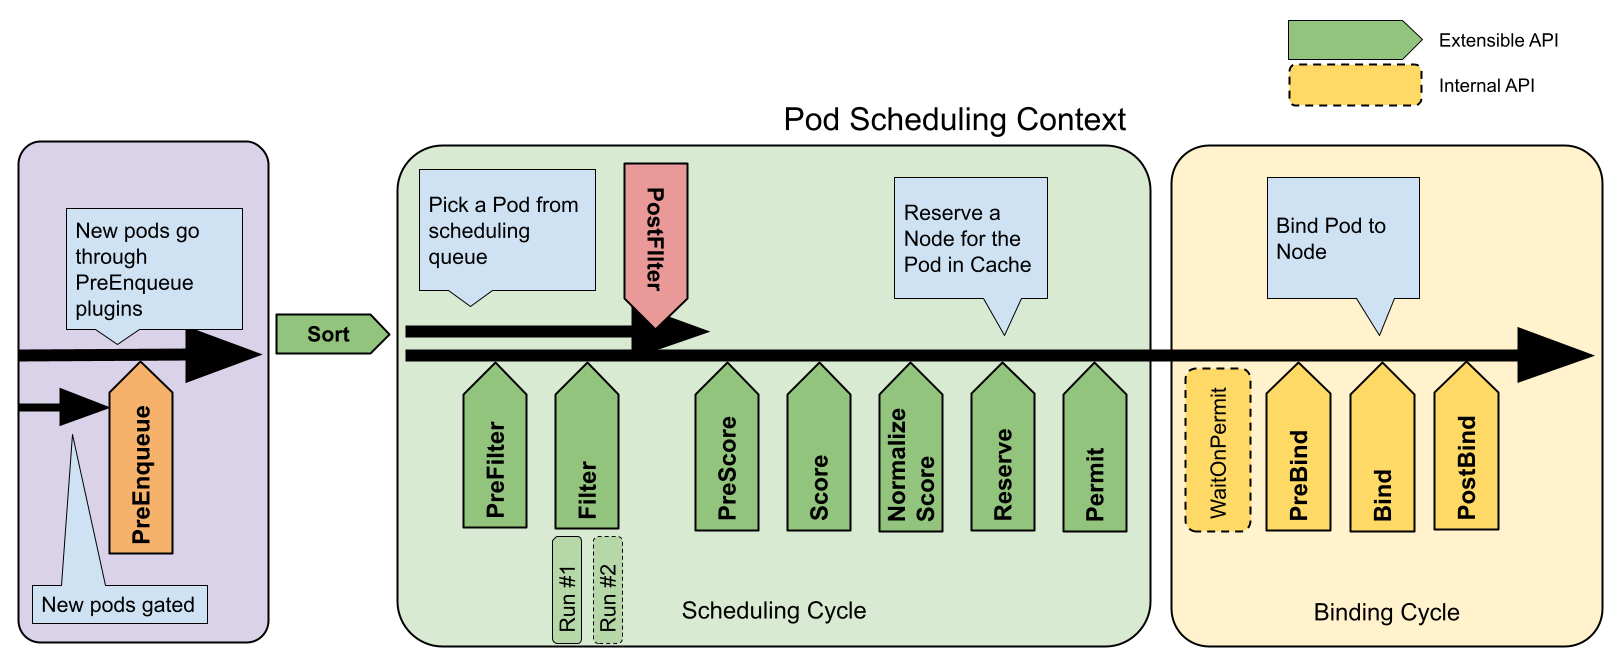
K8s的调度器是一个控制平面组件,负责将未绑定的Pod分配到合适的Node上。调度器会首先将不符合Pod要求的节点过滤掉,之后会对剩余的节点执行一系列的评分函数,并最终选出分数最高的节点并将Pod调度过去,如果有多个最高分数的节点就随机选择一个。
在整个过程中,scheduler profile 允许用户在调度的以下阶段运行指定的插件,而插件需要根据各个阶段的接口定义作出合法的实现。
queueSort: 对pending的Pod进行排序preFilter: 在filter之前对Pod和集群信息进行检查和预处理filter: 过滤掉不符合Pod要求的节点preScore: 打分之前score: 计算每个节点的分数reserve: 一个信息扩展点,用于在给pod保留资源的时候通知插件permit: 禁止或延迟Pod和Node的绑定preBind: 在绑定之前能做一些事情bind: 绑定Pod和NodepostBind: 信息扩展点,用于在Pod绑定之后通知插件

使用scheduler profile 禁用和启用特定的插件, 并为不同的插件的打分函数设置权重:
apiVersion: kubescheduler.config.k8s.io/v1
kind: KubeSchedulerConfiguration
profiles:
  - plugins:
      score:
        disabled:
          - name: PodTopologySpread
        enabled:
          - name: MyCustomPluginA
            weight: 2
          - name: MyCustomPluginB
            weight: 1
kubectl apply -f scheduler-profile.yaml
简单自定义调度器
要想让调度器按照自己的算法行事,可以创建一个调度器,并将自己的逻辑代码以插件的形式加入到其中,从而得到一个包含了你自定义插件的新调度器。
下面展示一个简单的调度器,先看看目录结构:
.
├── deploy
│   └── rbaclock.yaml
├── go.mod
├── go.sum
├── main.go
└── pkg
    └── plugin
        └── plugin.go
main.go 是入口文件, 它创建了一个调度器,包含了普通Kubernetes调度器的所有功能,同时还加载了一个自定义的调度插件。
package main

import (
	"os"
	plugin "scheduler/pkg/plugin"

	"k8s.io/component-base/cli"
	"k8s.io/klog/v2" // Add klog import

	"k8s.io/kubernetes/cmd/kube-scheduler/app"
)

func main() {
	klog.InitFlags(nil)
	defer klog.Flush()

  // 创建新的调度器对象
	command := app.NewSchedulerCommand(
    // 告诉调度器要加载一个额外的调度插件
		app.WithPlugin(plugin.Name, plugin.New),
	)

	code := cli.Run(command)
	os.Exit(code)
}
再来看看plugin.go, 这里实现了一个调度器插件,以Score阶段为例子,通过实现自定义的Score函数,我们可以在打分环节自定义打分逻辑:
package plugin

import (
	"context"
	"math/rand"

	v1 "k8s.io/api/core/v1"
	"k8s.io/apimachinery/pkg/runtime"
	log "k8s.io/klog/v2"
	"k8s.io/kubernetes/pkg/scheduler/framework"
)

const Name = "ExamplePlugin"

type ExamplePlugin struct{}

// 确保 ExamplePlugin 类型实现了 ScorePlugin 接口
var _ framework.ScorePlugin = &ExamplePlugin{}

func (p *ExamplePlugin) Name() string {
	return Name
}

func (p *ExamplePlugin) Score(ctx context.Context, state *framework.CycleState, pod *v1.Pod, nodeName string) (int64, *framework.Status) {
  // 使用随机数作为每一个节点的得分
	return int64(rand.Intn(100)), framework.NewStatus(framework.Success)
}

func (p *ExamplePlugin) PostBind(ctx context.Context, state *framework.CycleState, pod *v1.Pod, nodeName string) {
  // 在绑定Pod和Node之后,打印出最终的调度决策
	log.Infof("Decision: %s/%s => %s", pod.Namespace, pod.Name, nodeName)
}

// ScoreExtensions returns the ScoreExtensions interface.
func (p *ExamplePlugin) ScoreExtensions() framework.ScoreExtensions {
	return nil
}

func New(ctx context.Context, _ runtime.Object, _ framework.Handle) (framework.Plugin, error) {
	return &ExamplePlugin{}, nil
}
最后,就是运行调度器了,首先编译它
go build -o scheduler main.go
然后运行该调度器,为了让调度器能够在运行的时候加载自定义的插件,我们需要创建scheduler profile。这里使用clientConnection并让调度器使用一个高权限的凭证连接到集群,确保有足够的权限。然后给调度器起一个名字, 并在指定的阶段执行插件中对应的函数。
apiVersion: kubescheduler.config.k8s.io/v1
kind: KubeSchedulerConfiguration
clientConnection:
  kubeconfig: "/home/ch4ser/Projects/rbaclock/experiment/environment/debian-minikube/data/config"
profiles:
  - schedulerName: example
    plugins:
      score:
        enabled:
          - name: ExamplePlugin
      postBind:
        enabled:
          - name: ExamplePlugin
运行
./scheduler --config scheduler-profile.yaml
完成!最后使用一个简单的yaml文件创建一个pod, 让我们的调度器而不是默认调度器来调度它测试一下就可以观察效果了,日志信息可以通过vscode的k8s插件来看.
apiVersion: v1
kind: Pod
metadata:
  name: example-pod
spec:
  schedulerName: example
  containers:
    - name: nginx
      image: nginx
